
PokeSurvivor Tier List
This comprehensive character ranking system evaluates all 29 starter Pokémon from S to C grade, plus the gacha partners we rate highest for the mid game bosses and the Arceus phase. Switch between game phases, filter by move type or search a name, and open any card for detailed stats, move information, evolution path and our reasoning behind each placement.
Understanding partner strengths is crucial for surviving longer runs. Each Pokémon's effectiveness varies dramatically across different game stages, making it essential to know which choices excel in early encounters versus late-game endurance battles. This guide helps players make informed decisions about team composition and starter selection.
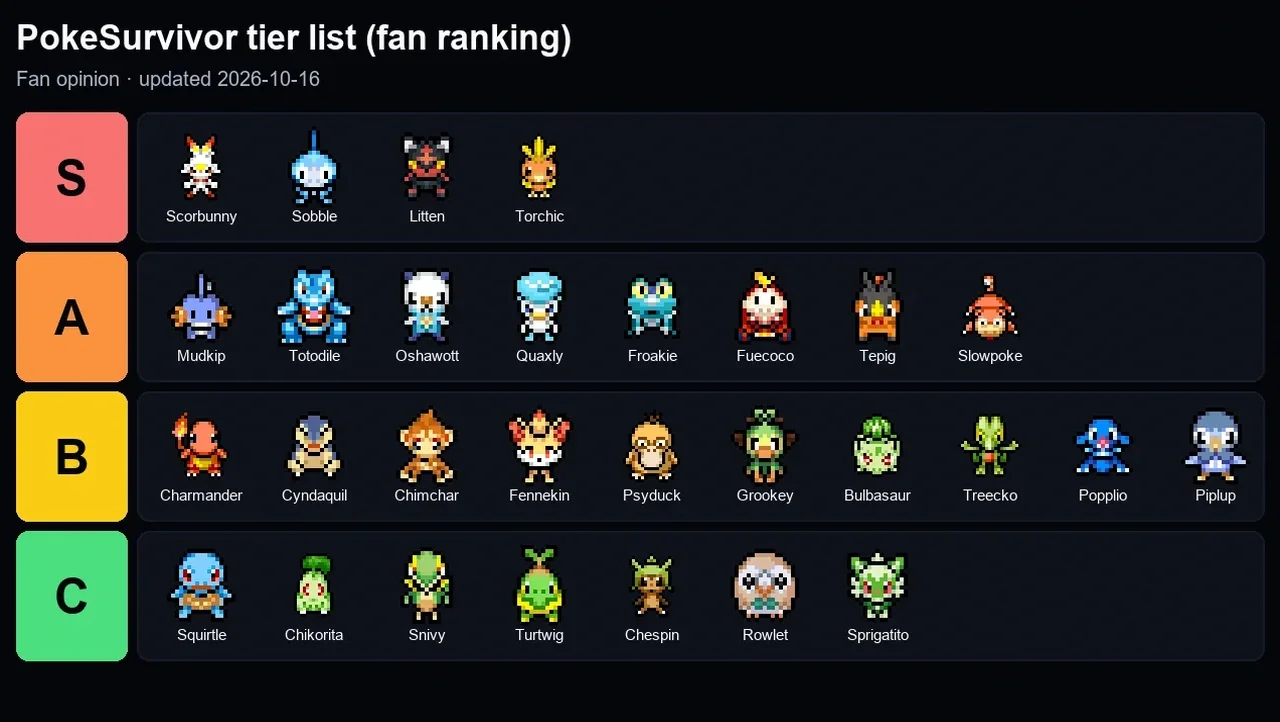
PokeSurvivor tier list at a glance
- S: Best picks for this phase
- A: Strong, small trade-offs
- B: Workable, clear weakness
- C: Not recommended
These rankings represent our fan opinion, built from the official numbers in the game's public source code (pokedex.js and moves.js at commit c31715d). Only the active move fires, and held items, bonds and card luck can change any run.
Understanding Character Rankings
A character ranking system helps players identify which Pokémon partners perform best at different stages of the game. The S-grade represents top performers with minimal weaknesses, while A-grade indicates strong options with small trade-offs. B-grade characters are workable but have clear disadvantages, and C-grade choices face significant challenges that make them harder to succeed with compared to alternatives.
Partner evaluation considers multiple factors: base statistics (HP, speed, attack multiplier), starting move effectiveness, evolution paths, and synergy with the game's meta. Early encounters prioritize burst damage and kiting ability, while late-game survival depends heavily on defensive stats and mobility. The meta environment shifts dramatically after minute 30 when Arceus transforms runs into endurance tests where positioning and sustainability matter more than raw damage output.
How Game Phase Affects Performance
Game phases represent distinct power curves where different attributes become critical. The early phase covers your first encounters using starter Pokémon from the personality quiz. During this period, your partner's starting move and attack multiplier determine clear speed and damage output. Players should focus on partners that combine strong base moves (Water Gun's pierce, Ember's burn damage) with attack multipliers above 1.05.
Mid-game introduces gacha partners with significantly higher stat multipliers, ranging from ×1.27 to ×1.51. Boss encounters at minutes 3, 6, 9, 12, and 15 test your damage output against high-HP targets that enrage at half health. Partners with exceptional attack multipliers like Haxorus (×1.51) excel here because they can burst through boss health pools before enrage mechanics extend fights dangerously.
Late-game fundamentally changes evaluation criteria. After minute 30, Arceus initiates an endless mode where legendary Pokémon spawn every 5 seconds with exponentially scaling health and damage. Survival becomes the primary goal, making HP pools and movement speed more valuable than attack power. Characters like Garchomp and Dragapult rank highest in late-game specifically because they balance defensive stats with mobility needed to dodge telegraphed attacks indefinitely.
Interactive Character Ranking Board
Early game: the 29 starters
Your first runs, with the partner the personality quiz gives you (or the one you pick instead). The starting move and the attack multiplier decide most of your damage here, so this part of the PokeSurvivor tier list weights those two first, then speed for kiting.
S tier, Early game
-
Highest starter attack (×1.09) on Ember, plus 107 speed to kite.
-
Water Gun pierce with 107 speed and ×1.08 attack.
-
Ember with 107 speed.
-
Second-best Ember attack, a little slower.
A tier, Early game
-
Same attack as Sobble, 12 less speed.
-
Solid all-round Water Gun user.
-
Balanced HP, speed and attack.
-
Slightly tankier Water Gun option.
-
Fastest starter (108), lowest HP.
-
Second-highest starter HP, on Ember.
-
Tanky Ember user.
-
Most starter HP (110) and homing shots, but the slowest.
B tier, Early game
-
Average attack and low HP.
-
Same numbers as Charmander.
-
Below-average attack for an Ember user.
-
Fragile but workable.
-
Homing Confusion with better speed than Slowpoke.
-
Best body for Vine Whip.
-
Good attack, slow to reposition for melee.
-
Average stats all round.
-
Best Razor Leaf user thanks to 107 speed.
-
Bubble nova covers all sides but is weak per hit.
-
Slightly tankier Bubble user.
C tier, Early game
-
Melee move on a slow body.
-
Plain ×1.00 attack.
-
Fast but fragile.
-
Good move, sub-1.00 attack.
-
Sub-1.00 attack on a melee move.
-
Lowest starter attack (×0.95).
Mid game: gacha partners for the bosses
Once gacha tickets bring in new partners, the bosses at minutes 3, 6, 9, 12 and 15 become the test. Attack multipliers jump to ×1.27–×1.51, so raw damage leads this phase.
S tier, Mid game
-
Biggest attack multiplier we list (×1.51) on a 24-damage beam.
-
Shadow Ball pierces 2, good for reaching healers behind a pack.
A tier, Mid game
-
Homing Confusion with ×1.44 attack and 128 speed.
-
Thunder Shock: 0.40 s cooldown, pierce 2.
-
Ember on a much stronger body than any starter.
B tier, Mid game
-
Fast, and two types widen its move pool.
Late game: minute 30 and Arceus
At minute 30 Arceus takes you to the Ruins of Judgment. Arceus is invincible and speeds up, and every 5 s a legendary joins with twice the HP and damage of the previous one. Surviving is the goal, so HP and speed count for more than damage.
S tier, Late game
-
Best mix of HP, speed and attack for the Arceus phase.
-
Fastest partner we list (138) for dodging telegraphs.
A tier, Late game
-
High attack; its Psychic type adds homing moves to the pool.
-
Huge HP, but slow.
B tier, Late game
-
Most HP we list (185), low damage.
-
Bulky, and Water gets ×1.5 in rain.
No partner matches that filter.
Complete Partner Statistics Table
Every partner on this character ranking guide with its verified in-game HP, speed and attack multiplier. Select any column header to sort the table and compare statistics across different partners. These numbers come directly from the game's source code and represent base values before card bonuses or held item effects.
| Pokémon | Phase | Tier | |||
|---|---|---|---|---|---|
| Scorbunny | Early | S | 92 | 107 | 1.09 |
| Sobble | Early | S | 92 | 107 | 1.08 |
| Litten | Early | S | 90 | 107 | 1.06 |
| Torchic | Early | S | 90 | 97 | 1.08 |
| Mudkip | Early | A | 92 | 95 | 1.08 |
| Totodile | Early | A | 92 | 96 | 1.06 |
| Quaxly | Early | A | 95 | 99 | 1.06 |
| Oshawott | Early | A | 95 | 97 | 1.05 |
| Froakie | Early | A | 88 | 108 | 1.04 |
| Fuecoco | Early | A | 100 | 93 | 1.05 |
| Tepig | Early | A | 99 | 97 | 1.05 |
| Slowpoke | Early | A | 110 | 84 | 1.06 |
| Charmander | Early | B | 88 | 105 | 1.03 |
| Cyndaquil | Early | B | 88 | 105 | 1.03 |
| Chimchar | Early | B | 90 | 104 | 1.02 |
| Fennekin | Early | B | 88 | 103 | 1.04 |
| Psyduck | Early | B | 92 | 101 | 1.06 |
| Grookey | Early | B | 92 | 105 | 1.06 |
| Turtwig | Early | B | 95 | 91 | 1.07 |
| Bulbasaur | Early | B | 90 | 97 | 1.06 |
| Treecko | Early | B | 88 | 107 | 1.06 |
| Popplio | Early | B | 92 | 95 | 1.06 |
| Piplup | Early | B | 94 | 95 | 1.04 |
| Chespin | Early | C | 95 | 94 | 1.04 |
| Rowlet | Early | C | 101 | 96 | 1.00 |
| Sprigatito | Early | C | 88 | 105 | 1.04 |
| Squirtle | Early | C | 90 | 96 | 0.97 |
| Chikorita | Early | C | 90 | 97 | 0.97 |
| Snivy | Early | C | 90 | 104 | 0.95 |
| Haxorus | Mid | S | 104 | 119 | 1.51 |
| Gengar | Mid | S | 97 | 124 | 1.42 |
| Alakazam | Mid | A | 95 | 128 | 1.44 |
| Jolteon | Mid | A | 99 | 133 | 1.31 |
| Cinderace | Mid | A | 106 | 128 | 1.34 |
| Greninja | Mid | B | 102 | 129 | 1.27 |
| Garchomp | Late | S | 119 | 121 | 1.42 |
| Dragapult | Late | S | 110 | 138 | 1.36 |
| Metagross | Late | A | 106 | 107 | 1.44 |
| Snorlax | Late | A | 142 | 91 | 1.31 |
| Blissey | Late | B | 185 | 101 | 1.11 |
| Swampert | Late | B | 115 | 103 | 1.31 |
Starting Move Rankings and Analysis
The starting move determines your early damage output and defines your evolution path. Each of the six starter moves offers unique patterns and trade-offs. Move statistics below come from the official moves.js file; the rankings reflect our analysis of how these numbers translate to practical performance.
Water Gun leads with its 0.44-second cooldown (fastest among starters) and pierce property that lets damage hit multiple enemies in a line. Vine Whip excels at crowd control with its wide melee arc and knockback effect, clearing space around your character. Ember delivers the highest single-target damage at 18 per hit with burn status, though it lacks area coverage. Understanding these move characteristics helps predict which partners will perform better in different encounter types.
| Tier | Move | Cooldown | Damage | Pattern | Evolves into | Card |
|---|---|---|---|---|---|---|
| S | Water Water Gun | 0.44 s | 14 | Piercing projectile (pierce 1, reliable at any distance) | Scald | Power |
| S | Grass Vine Whip | 0.62 s | 16 | Melee wide arc (radius 68, knockback) | Power Whip | Power |
| A | Fire Ember | 0.52 s | 18 | Projectile (burns) | Fire Blast | Power |
| A | Water Bubble | 1.00 s | 9 | Nova, 8 bubbles (slows) | Surf | Sprint |
| B | Grass Razor Leaf | 0.90 s | 10 | Boomerang, 2 leaves (out and back) | Leaf Storm | Reflexes |
| B | Psychic Confusion | 0.58 s | 13 | Homing projectile (auto-aims) | Psyshock | Reflexes |
- Water Gun: Fastest cooldown of the six plus a pierce, so it stays reliable at any distance.
- Vine Whip: Wide arc with knockback clears the crowd around you.
- Ember: Hardest single hit of the six and it burns, but it only hits one target.
- Bubble: Eight slowing bubbles cover every direction, at 9 damage each.
- Razor Leaf: Two boomerang leaves reward positioning; lowest damage per hit.
- Confusion: Homing means no aiming, at the cost of mid damage.
Evolution cards
Moves level up to 5. Reach max level and take the required stat card in the same run, and a golden evolution card appears.
| Card | Effect | Unlocks |
|---|---|---|
| Power | +10% damage | Ember → Fire Blast, Water Gun → Scald, Vine Whip → Power Whip |
| Sprint | +7% move speed | Bubble → Surf |
| Reflexes | −8% cooldown | Razor Leaf → Leaf Storm, Confusion → Psyshock |
Strategic Guide to Character Selection
Early Game Strategy
Attack multiplier on a strong starting move wins in early encounters. Scorbunny, Sobble, Litten and Torchic top the early character rankings because they combine attack multipliers above 1.06 with S-tier or A-tier moves. During your first runs, prioritize killing healers and shielders first, as they support enemy packs and extend fights dangerously. Step out of the filling circles and lines telegraphed on the ground to avoid taking unnecessary damage.
Movement and positioning become crucial even in early stages. Partners with 105+ speed can kite effectively, staying just ahead of enemy melee range while dealing damage. This kiting strategy works particularly well with projectile moves like Water Gun and Ember that hit at range. Confusion's homing property removes the need for precise aiming, making it easier for players new to the genre to land consistent damage.
Mid Game Boss Strategy
Five bosses arrive at minutes 3, 6, 9, 12 and 15, each with significantly more health than regular enemies. Bosses and legendaries telegraph 4 major attacks with visual indicators, giving you time to dodge. They enrage at half HP, dealing increased damage and speeding up their attack patterns. High attack multipliers like Haxorus (×1.51) excel here because they can burst through boss health pools quickly, ideally ending fights before enrage mechanics make them dangerous.
Boss positioning requires different tactics than swarm clearing. Stand at mid-range to see telegraph indicators clearly while maintaining damage uptime. Piercing moves gain extra value against bosses because many spawn with supporting enemies, letting your attacks hit both the boss and its reinforcements. Evolution cards become available during mid-game, so plan your stat card picks to unlock your move's evolution before the minute 15 boss if possible.
Late Game Endurance Strategy
From minute 30 the run transforms into an endurance test. Garchomp and Dragapult lead the late-game rankings because they pair high HP (119 and 110 respectively) with exceptional speed (121 and 138) for dodging. The Arceus phase spawns legendary Pokémon every 5 seconds with health and damage that doubles each wave, making it mathematically impossible to kill everything. Instead, focus on survival through positioning and defensive play.
Speed matters more than damage in late-game because you need to dodge constantly while maintaining safe distance from exponentially scaling enemies. HP pools provide margin for error when telegraphs overlap or spawn patterns trap you temporarily. Partners with both attributes can survive longer, giving you more time to climb leaderboards. Avoid greedy damage attempts that put you in danger—in endless mode, staying alive for 10 more seconds beats a single extra kill.
Held Items and Bonds
- Choice Band: +40% damage, but you can't switch moves.
- Quick Claw: −20% cooldown.
- Life Orb: +30% damage, attacks cost HP.
- Shell Bell: heal from damage dealt.
- Bonds: each rift legendary beaten links two moves to fire at once from one slot, up to 4 bonds.
Held items dramatically alter partner performance by modifying core stats or adding new mechanics. Choice Band provides the largest damage boost at +40%, but locks you into a single move slot, removing flexibility. This trade-off works best on partners with powerful primary moves who don't rely on move switching. Quick Claw's −20% cooldown reduction effectively increases DPS by letting you attack more frequently, pairing well with high-damage moves like Ember or Dragon Rage.
Life Orb offers +30% damage at the cost of HP drain on each attack, creating a risk-reward dynamic that suits high-speed partners who can kite effectively and avoid incoming damage. Shell Bell provides sustain through healing based on damage dealt, turning aggressive play into survivability. Legendary bonds represent the most powerful mechanic: each rift legendary beaten links two moves to fire simultaneously from one slot, up to 4 bonds. This effectively doubles your damage output per slot, making bond accumulation a critical objective in longer runs.
Co-op Team Composition
Up to 4 players share XP in multiplayer runs, creating unique strategic considerations. A downed player can be revived by a teammate standing next to them for 3 seconds, making tanky partners like Slowpoke or Snorlax valuable team picks because they can safely approach downed allies. Piercing moves gain extra utility in co-op because enemy packs cluster more densely, letting pierce effects hit multiple targets including healers positioned behind front-line enemies. Team composition should balance damage dealers with at least one defensive partner for safe revivals.
Common Mistakes That End Runs Early
New players frequently make the same tactical errors that shorten runs or prevent reaching minute 30. The most common mistake is ignoring enemy healers and shielders in favor of high-damage targets. Healers restore large chunks of enemy HP and multiply effective enemy health by 2-3×, making them priority targets despite lower individual threat. Always scan for healers (identified by green healing circles around nearby enemies) and prioritize them with piercing moves that bypass front-line protection.
Standing still while attacking represents another critical error. PokeSurvivor rewards constant movement—kiting in circles or figure-eights while maintaining damage uptime. Partners with 100+ speed excel at this pattern, staying just outside melee range while projectile moves hit pursuing enemies. Static play lets enemy packs surround you, turning avoidable damage into guaranteed hits that drain HP pools needed for late-game survival.
Card selection mistakes compound over time. Taking damage cards exclusively creates glass cannon builds that die quickly in the Arceus phase where survivability matters most. Balance offensive cards (Power, Reflexes) with defensive options (HP, Regen, Speed). Evolution cards deserve priority because evolved moves provide significant DPS increases—for example, Ember evolves into Fire Blast with the Power card, nearly doubling damage output. Missing evolution timing by taking the wrong stat card wastes the entire run's potential.
Finally, underestimating the minute 30 difficulty spike catches players unprepared. Arceus fundamentally changes the game from an offense-focused clear to a defense-focused survival test. Players who enter this phase with low HP pools (under 100) or slow partners (under 100 speed) find themselves unable to dodge telegraphed attacks or absorb mistakes. Plan your build progression with late-game requirements in mind from the start, not just early clearing speed.
Understanding Arceus Phase Scaling Math
At exactly minute 30, Arceus appears and takes players to the Ruins of Judgment, initiating endless mode. This phase features exponential scaling that makes traditional clear strategies impossible. Every 5 seconds a new legendary Pokémon spawns with exactly double the HP and damage of the previous one. The first legendary might have 500 HP; the second has 1,000 HP; the third has 2,000 HP; the tenth has 256,000 HP. This doubling continues indefinitely, creating enemies you cannot meaningfully damage after just 10-15 spawn cycles.
According to the game's spawn code (ruins.js, commit c31715d), legendary spawn timing follows a fixed 5-second
interval with no variance. The HP multiplier formula is baseHP × 2^(waveNumber - 1), and damage
scales identically. By wave 15 (at approximately minute 31:10), enemies have 16,384× base stats. Even a ×1.51
attack multiplier partner like Haxorus with fully upgraded moves cannot kill fast enough to prevent screen
saturation with invulnerable threats.
This mathematical reality explains why the late-game character rankings prioritize HP and speed over attack multipliers. Damage becomes irrelevant when enemies scale exponentially while your stats scale linearly through card bonuses. Garchomp's 119 HP provides buffer for 2-3 hits from scaled legendaries; Dragapult's 138 speed creates enough distance to dodge telegraph patterns. Survival time correlates directly with mobility and mistake tolerance, not damage output. Leaderboard runs past minute 35 require near-perfect dodging, making speed the only stat that still matters.
Move Speed Analysis: Water Gun vs Thunder Shock
Water Gun ranks as the fastest starting move at 0.44-second cooldown, giving it best-in-class DPS among the six starter options. This explains why Water Gun partners dominate the early S and A tiers despite moderate per-hit damage (14). The cooldown advantage means approximately 136 shots per minute compared to Ember's 115 shots, closing the damage-per-hit gap through volume. Water Gun's pierce property adds additional value by hitting 2 enemies per shot, effectively doubling output in dense packs.
However, gacha partners introduce Thunder Shock with a 0.40-second cooldown—10% faster than Water Gun and the fastest move we have verified in the official moves.js data. Jolteon carries Thunder Shock with ×1.31 attack and 133 speed, making it a strong mid-game upgrade over any starter. Thunder Shock also pierces 2 targets like Water Gun, matching its multi-target utility. The 0.04-second cooldown difference translates to 150 shots per minute, giving Thunder Shock users 10% more DPS uptime than Water Gun at equivalent attack multipliers.
This comparison illustrates why move cooldown matters as much as damage per hit. A 0.40s move at 13 damage (Thunder Shock: 32.5 DPS) outperforms a 0.52s move at 18 damage (Ember: 34.6 DPS) once attack multipliers equalize through partner stats and card bonuses. Faster cooldowns also improve kiting effectiveness because shorter animation locks allow more frequent repositioning. When evaluating partners, consider both the move's base cooldown and the partner's attack multiplier—the cooldown determines your theoretical max DPS ceiling while the multiplier scales that ceiling upward.
Character Ranking Update History
This guide receives regular updates to match game balance changes and newly discovered strategies. Each update verifies partner statistics against the official source code to ensure accuracy. Check this section periodically to understand how recent patches have affected character performance and rankings.
- 2026-10-16: Rebuilt the PokeSurvivor tier list as a tier board with phase tabs, filters, a detail panel and a sortable stat table. Corrected all six starting move stats against the official moves.js (Ember is 0.52 s and 18 damage, for example). Removed a boss HP figure the game does not fix, and corrected how legendary bonds work.
- 2026-10-14: Game update: drag attacks, pause button, joystick anywhere and an optional fixed joystick. No stat changes that affect this list.
- 2026-10-12: Game update: runs became endless, with Arceus at minute 30. This is why the late-game list favours HP and speed.
- 2026-10-10: Game update: boss HP ×1.35 and boss damage ×1.2, which raises the value of high attack multipliers in mid game.
- 2026-10-08: Game update: enemies that heal, shield, summon or explode. Piercing moves gained value for reaching healers.
PokeSurvivor tier list FAQ
Who is the best partner on the PokeSurvivor tier list?
It depends on the phase. Among the 29 starters, Scorbunny (×1.09 attack on Ember) leads our early S tier. In mid game Haxorus has the biggest multiplier we list (×1.51). For minute 30 and Arceus we rank Garchomp and Dragapult highest for their mix of HP and speed.
Does the PokeSurvivor tier list change by phase?
Yes. Early game rewards attack on a strong starting move, mid game rewards high multipliers for the five bosses, and late game weights HP and speed for the endless Arceus phase.
Which starting move is best?
We rank Water Gun and Vine Whip highest. Water Gun has the fastest cooldown (0.44 s) and pierces; Vine Whip hits a wide arc with knockback. Both evolve with the Power card. Ember hits hardest per shot (18) and ranks just behind.
Can a C-tier partner still win runs?
Yes. This list rates base stats and default moves only. Held items such as Choice Band (+40% damage), legendary bonds and the cards you draw can lift any partner in a given run.
What do legendary bonds do?
Each rift legendary you beat grants a bond that links two moves so they fire at once from one slot, up to 4 bonds. Without a bond only the active move fires.
How often is this tier list updated?
We re-check the numbers against the official source when the game changes balance. This version matches the game of 2026-10-14 and was updated on 2026-10-16. See the changelog on this page.